If you’re running a small-scale off-grid solar operation, designing a mobile pop-up food truck that needs to power refrigeration and cooking equipment, or setting up a backup power system for a remote construction site, chances are you’ve realized the stock inverter enclosures you find at big-box stores or generic hardware suppliers just don’t cut it. As an inverter enclosures supplier who’s been helping engineers, small business owners, and DIYers build custom setups for 12 years, I’ve seen firsthand how a poorly designed enclosure can turn a solid inverter into a paperweight—overheating from trapped air, corroding from dust or rain, or failing to protect sensitive wiring from rough handling. Today, I’m breaking down the step-by-step process I walk every customer through when building a custom inverter enclosure that works as hard as the inverter inside it. No fancy jargon, no generic advice, just real-world lessons from 1,000+ custom projects. Inverter Enclosures
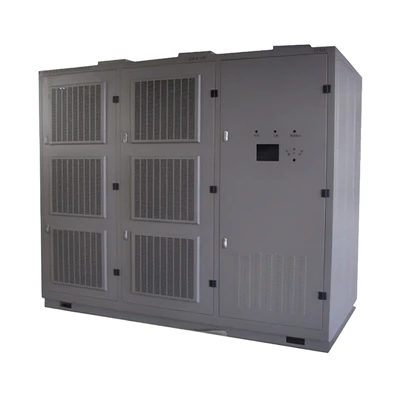
First, let’s start with the non-negotiables: knowing exactly what your inverter needs, and what your environment will throw at it. I can’t tell you how many times I get a customer asking for a “one-size-fits-all metal box” only to later find out their 3,000-watt inverter runs hot enough to melt plastic, or they need the enclosure to survive year-round in a coastal area where salt air eats through steel. The very first step I always make customers do is pull two sets of numbers: your inverter’s specifications, and your operational environment specs. For the inverter, you need three core stats: continuous wattage, peak surge wattage, and operating temperature range. Most small inverters have a 0°C to 40°C operating window, but if you’re mounting it in a hot utility truck bed or a small shed with no ventilation, you’ll need an enclosure that actively pulls heat out, not just traps it. For environment, ask yourself: will this be outdoors? If yes, is it in a dry, dusty desert, a humid coastal town, or a rainy mountain region? Will it be jostled around on a trailer for cross-country work, or sitting on a permanent concrete pad? These answers will determine every material choice we make, so don’t skip this step.
Next, choose your base material—this is where 90% of amateur builds go wrong, and it’s where my team adds the most value as a supplier. There are three main options for custom inverter enclosures, each with a clear use case, and I’ve tested all of them in real conditions. The first is carbon steel, which is the most durable and cheapest option for permanent, dry installations. The downside? It rusts if you so much as splash water on it, so if you’re using it outdoors in any way, you need a heavy-duty powder coat (not a cheap paint job) to seal it. I once had a customer build a carbon steel enclosure for a remote well pump backup system, skipped the powder coat, and by the end of the first rainy season, the mounting bracket had rusted straight through, dropping the inverter onto the wet ground. The second option is aluminum, which is corrosion-resistant, lightweight, and perfect for mobile setups like food trucks or construction trailers. It won’t rust in coastal air, and it’s easy to work with, but it’s softer than steel, so if you’re mounting it somewhere that might get hit with tools or debris, you’ll need a thicker gauge (1/8 inch minimum) to avoid dents that can crack wiring or block vents. The third option is fiberglass-reinforced plastic (FRP), which is non-conductive, extremely lightweight, and totally corrosion-proof. This is my go-to for marine applications or desert installations where dust is a constant issue, but it’s more expensive than steel or aluminum, and it can crack if dropped from height. Last year, I worked with a boat owner who needed an enclosure for his trolling motor inverter—aluminum would have corroded in saltwater, steel would have added too much weight, so FRP was the only call that worked.
Now, sizing the enclosure: this isn’t just “bigger is better.” A common mistake people make is buying an enclosure that’s 6 inches longer and wider than their inverter, only to end up with dead air space that traps heat. The rule of thumb I use with all customers is: measure your inverter’s length, width, and height, then add 1.5 inches to each side for wiring clearance, and add at least 2 inches of space on the top and bottom for ventilation. Why top and bottom? Because hot air rises—if all your vents are on the front, you’ll create a heat trap inside the enclosure, even with a good fan. If your inverter is 12 inches long, 8 inches wide, and 6 inches tall, your minimum enclosure size would be 15 inches long, 11 inches wide, and 10 inches tall. That extra space for wiring means you won’t have to cram thick 2AWG inverter cables into a tight corner, which can cause resistance and overheating, and that vertical space on top and bottom lets air flow in and out without needing a super powerful fan. If you plan to add extra components—like a battery monitor, a breaker, or a charging controller—add another 3 inches to each dimension to make room for those too. I always tell customers to leave a little extra space for future upgrades; I’ve had several clients come back a year after their first enclosure build asking if they can add a second inverter for more power, and it’s way easier to modify an enclosure that already has extra room than to build a whole new one from scratch.
Ventilation is the make-or-break part of any custom inverter enclosure. I don’t care if you pick the best aluminum material or the perfect size—if your inverter can’t get fresh air, it will overheat, reduce its lifespan by half, and even become a fire hazard. There are three types of ventilation I recommend, depending on your inverter’s heat output. Passive ventilation is for inverters under 2,000 watts that run cool enough on their own. For this, you’ll want two sets of vents: an intake vent on the bottom (usually 4 inches in diameter) and an exhaust vent on the top, spaced at least 8 inches away from the intake to create a cross-flow of air. Never put intake vents on the back of the enclosure—when it’s sitting on a flat surface, the back side will be blocked, and air can’t flow through. For inverters between 2,000 and 5,000 watts, add a small inline cooling fan to the intake vent, wired to the inverter’s low-voltage trigger so it only turns on when the inverter is running over 50% load. I use 12V DC fans for most off-grid setups, since they run off the same battery bank as the inverter, no separate power supply needed. The final type is active ventilation, which is for inverters over 5,000 watts or enclosures that are fully enclosed in a hot space (like a small equipment closet or a truck cab). For active ventilation, I recommend a vented louver on the intake and a square exhaust fan on the top, rated for at least 100 CFM (cubic feet per minute) of air flow. A quick test I do before finishing any enclosure: I tape a piece of tissue paper over the intake vent, turn on the inverter and fan, and make sure the tissue pulls in tight against the vent. If it doesn’t, your fan is too small, or your vents are blocked, and you need to adjust before installing the inverter.
Protection from elements and physical damage is next, especially if your enclosure is going outdoors. For water resistance, if you need it to be weatherproof (not just splash-proof), use gasketed doors and screw the vents with waterproof flanges. I always use silicone gasket material for door seams, and I add a rubber seal around any cable entry points to keep rain and dust out. If you’re in a dusty environment, add a mesh filter to the intake vent—this stops dirt and sand from getting into the inverter’s internal fan and coils, which is one of the top causes of inverter failure in desert areas. For physical protection, if your enclosure is going on a trailer or a job site where it might get bumped by tools or equipment, add rubber corner protectors and mounting brackets that bolt to the enclosure’s frame, not just the sides. I also recommend adding a lockable door for any enclosure that’s accessible to the public or unqualified people—you don’t want someone prying open the door and touching live inverter wiring, which is a safety hazard and can damage the inverter too. I recently had a customer whose food truck’s unenclosed inverter got knocked by a catering staff member, tripping the breaker and ruining an entire day of service—so a lockable door isn’t just a convenience, it’s a smart investment.
Wiring and component installation is the final step, and it’s where custom enclosures shine vs. stock models. The biggest mistake here is running inverter cables too close together, which causes voltage drop and overheating. I always tell customers to separate positive and negative inverter cables by at least 2 inches, and run them along different sides of the enclosure if possible, away from low-voltage wiring (like sensor wires or monitor cables). Use closed-end lugs on the battery and inverter connections, not bare wires—bare wires can corrode over time, and they’re more likely to short if something shifts inside the enclosure. If you’re adding a breaker or fuse, mount it as close to the battery as possible, not the inverter side—this protects the entire system, not just the inverter, if there’s a short circuit. I also recommend adding a cable gland on every entry point, instead of drilling random holes in the enclosure. Cable glands let you seal the gap around the wire, keeping out dust and moisture, and they make it way easier to add or remove wiring later without drilling new holes.
Now, as an inverter enclosures supplier who works with hundreds of people building custom setups every month, I know building your own enclosure can feel overwhelming. That’s why my team offers custom cutting, powder coating, and pre-drilled vent holes for any enclosure size, so you don’t have to spend hours with a drill and a measuring tape, risking a mistake that ruins your material. Whether you need a small aluminum enclosure for a portable 1,000-watt inverter for camping, a heavy-duty steel enclosure for a 10,000-watt backup power system for your home, or a marine-grade FRP enclosure for a boat’s inverter, we can source the right materials to match your exact specs, cut it to size, and ship it ready to assemble.

If you’ve been trying to make a stock enclosure work for your custom build, or you’re ready to build something that will last for years instead of just a few months, reach out to our team to discuss your project. We’ll walk you through every step, answer any questions, and make sure your enclosure is tailored exactly to your inverter, your environment, and your needs.
Battery Cabinets References:
- Solar Energy International. Off-Grid Inverter Installation Best Practices
- National Electrical Manufacturers Association. Enclosure Rating Standards for Outdoor Electrical Equipment
- American Boat and Yacht Council. Marine Inverter Enclosure Corrosion Prevention Guidelines
- OSHA. Electrical Safety Guidelines for Temporary Construction Power Systems
Zhejiang Litu Precision Technology Co., Ltd.
As one of the most professional inverter enclosures manufacturers and suppliers in China, we also support customized service. Please feel free to wholesale advanced inverter enclosures in stock here from our factory. Welcome to contact us for quotation.
Address: No.100 Jinkai Road, Binhai Industrial Zone, Dongchen Township, Xiangshan County, Ningbo City, Zhejiang Province
E-mail: yuleiting@zjltjm.com
WebSite: https://www.lituprecision.com/
